Pro tips for using MyGeotab groups and sub-groups
Learn how to optimize your business and increase overall efficiency using MyGeotab groups and sub-groups.

By Michael Tran
Dec 23, 2021

MyGeotab is a complete fleet management application that offers comprehensive solutions for managing and collecting data from Geotab GO devices. To organize all of this information, MyGeotab offers grouping structures so that members of your team can quickly access what they need. Read more about MyGeotab groups in this post.
Groups and sub-groups help define and accommodate different organizational structures, allowing for departmentalization of generating and reporting data. Consider the following:
- Functional structure: Your company has an upper management team that needs full visibility on all assets, however your hardware team only needs to see how many assets triggered specific events.
- Divisional structure: Your company contains various divisions that are responsible for assets in different locations. Not every user needs to see assets of other locations.
With groups and sub-groups, you have the flexibility to tailor MyGeotab to both situations.
What is a sub-group?
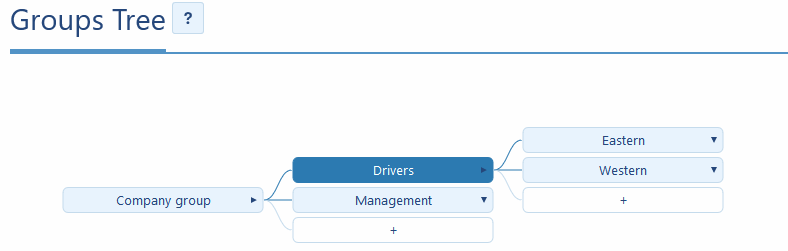
A sub-group is any group that is lower level (“child”) to a group of a higher level (“parent”). In the image below, the Company group is parent to Drivers which is in turn parent to Eastern and Western. Eastern and Western are considered children of both Drivers and the Company group.
Note: Access to a parent group also gives access to its child groups, but not vice-versa.
Using groups and sub-groups on MyGeotab
One of the quickest ways to see MyGeotab groups and sub-groups in action is to use them as a filter. Group filtering is available for numerous sections including vehicles, zones, rules and users.
However, users will only be able to filter for the groups that they have access to. You can verify these groups by selecting Administration from the menu and picking the Users page. Then, search for the user in question and check their data access permissions.
You can also filter by groups in MyGeotab without making explicit changes to the user profile. Select the groups you want to filter by in the Groups filter text box located at the top left of the screen.

Vehicles
You can set the group of specific vehicles from the Vehicle Edit page, shown below. The ability to edit group settings may be restricted based on clearance level.
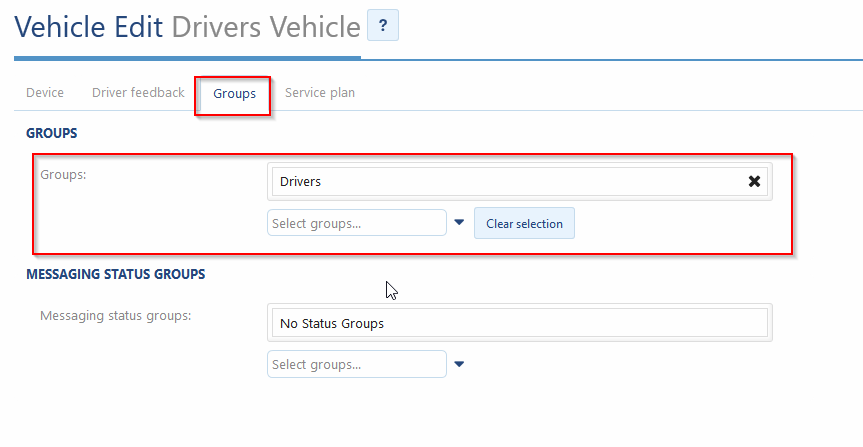
Currently, the driver's vehicle belongs to the group Drivers. According to the sample grouping structure listed above, essentially, we will be able to see this vehicle only if we are in the Drivers group (its parent company group) but not if we were only in the Eastern or Western groups.
Zones
You can also assign groups to zones. This is done with the Publish to groups field of the zone page.
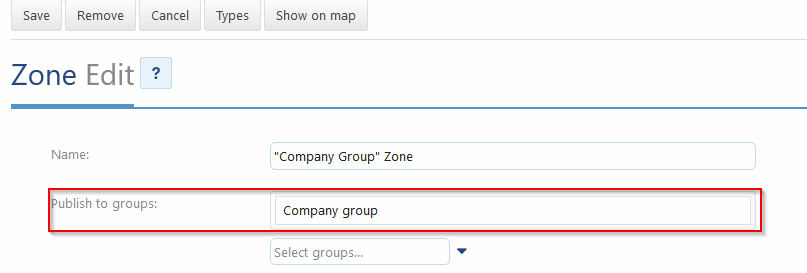
Here are the zones for our sample database:

These zones follow the same grouping structure described above. If we log in as someone who only has Driver group access, you can see below that we will no longer be able to see zones belonging to our parent groups.
See also: An overview of geofencing and routing in MyGeotab

Rules
Rules can be sorted into groups in a similar manner to zones. However, only custom rules can have their groups edited — system default rules cannot be modified in this way.
Groups work slightly differently with rules than with other features. The image below is what we can see if we have our data access set to Drivers.

We can still see rules that belong to the Company group, even though we would not be able to for vehicles or zones. This is because data access to a rule’s group also grants the ability to modify that rule. Since rules can affect someone even if they don’t have edit permissions, rules are visible to anyone who belongs to that rule’s child groups.
Using groups and sub-groups to set up reports
Groups and sub-groups can also be used to organize reports. Whether it is a report on the MyGeotab UI or an emailed report, groups and sub-groups can be used to help you organize the data being presented.
When setting up reports, you can specify two configurations regarding groups and sub-groups:
- Viewers/recipients of the report.
- Groups for which the data of the report belongs to.
Dashboard reports
You can use groups and sub-groups to organize who can view your dashboard reports as well as the data that is being reported. Under the Dashboard tab of your report, you can also specify who can view the report from the Dashboard viewers field. You can also select which groups’ data is being reported with the Belonging to field.
As seen above, managers will be able to view this Dashboard report. The report will also contain data that belongs to any assets in the Drivers group or its resulting child groups.
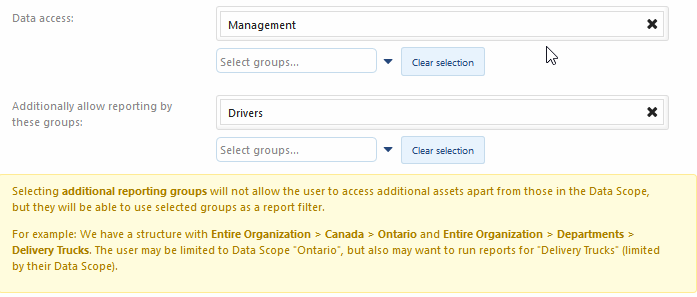
However, it is important to note that Management is not connected to the Drivers group. A user with Management data access will still receive the report, but they will not be able to see data from Drivers or its child groups (Eastern and Western) unless they have been given additional access.
You can set a user to be able to see reported data from groups outside their normal data access with the Additionally allow reporting by these groups setting on the user profile.
Email reports
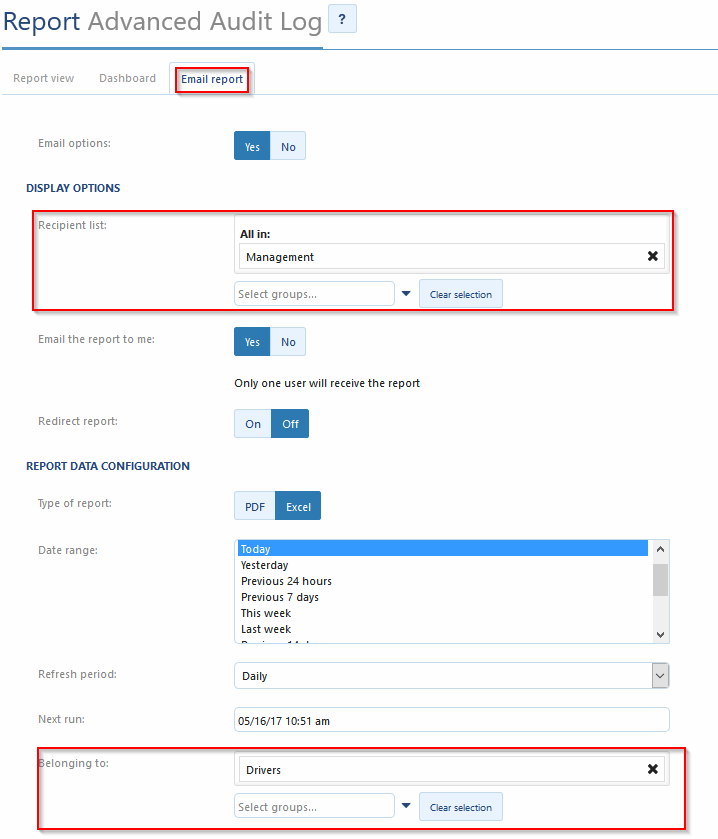
Similarly to Dashboard reports, you can use groups and sub-groups to help organize the recipients of the reports. Under the Email report tab of your report, you can also specify who will receive the email reports by selecting groups under the Recipient list field. You can also select which groups’ data is being sent by populating the Belonging to field.
Emailed reports follow the same settings as dashboard reports with regards to users being able to see data outside their normal groups.
With different uses for groups and sub-groups, it’s easy to arrange your MyGeotab data in a way that mirrors the rest of your organization’s structure and improve ease-of-access for all employees and management. Using groups and sub-groups can also help your fleet become more efficient.
Want to learn more? Find how-to videos and sign up for webinars at Geotab.com/training, or visit the Product Guide.
Subscribe to the Geotab Blog to receive our monthly newsletter of fleet news, tips and insights.
More from How-to:
Subscribe to get industry tips and insights
Michael Tran is a Software Developer at Geotab.
Table of Contents
Subscribe to get industry tips and insights
Related posts

Unified data: The key to fleet liability reduction for government agencies
March 19, 2026
9 minute read


How to stop wasting mechanic hours on ‘ghost codes’ and low-priority repairs
February 2, 2026
2 minute read