CDL pre-trip inspection test: What to study and how to pass
The CDL pre-trip inspection test asks drivers to prove that a vehicle is safe before driving it. Learn how drivers can prepare for the test and where they most often lose points.

By Geotab
Nov 2, 2026

Key Insights
- The CDL pre-trip inspection test requires drivers to identify components, explain how to check their condition and demonstrate brake checks.
- Procedures and scoring vary by testing system and state, so the current state CDL manual is the best study guide.
- Some states treat an incorrect or incomplete brake check as an automatic failure of the whole test.
- The habits drivers build for the test translate well to what fleets require daily, like regular inspections and DVIR workflows.
A driver leaves the yard without a walkaround. Forty miles later, an inspector at a weigh station finds a worn steer tire and air leak. The result is a citation and, worst of all, a load that sits until repairs are finished. The pre-trip inspection CDL test prepares drivers to identify defects before departure, helping prevent roadside violations and delays.
During the Commercial Vehicle Safety Alliance (CVSA) 2026 International Roadcheck, a 72-hour inspection and enforcement initiative conducted by commercial vehicle inspectors across North America, 19% of inspected vehicles were placed out of service. To reduce the operation of unsafe vehicles, Federal Motor Carrier Safety Administration (FMCSA) requires drivers to confirm a vehicle is safe before departing.
This guide is for fleets that hire and onboard new drivers. It covers a walk-through of each inspection zone, the air-brake check, test-day tips and the most common mistakes drivers make.
What to expect on the CDL pre-trip inspection test
The CDL test consists of a vehicle inspection, a basic control test and an on-road test. Unlike a routine walkaround where the goal is to identify problems, the inspection test asks driver applicants to show the examiner what they check and why. The New York State Commercial Driver Manual says drivers must:
- Point to or touch each component and explain the condition they are checking
- Demonstrate brake checks like the air-brake check on air-equipped vehicles
- Complete an engine start and in-cab inspection, plus all or part of the external inspection assigned by the examiner
Those core tasks apply to every state, but details vary by vehicle and testing system. The vehicle type determines which components drivers must inspect. A Class B CDL pre-trip inspection uses a straight truck or bus, for example, so coupling checks do not apply. Testing systems differ as well, and states with a modernized vehicle inspection test allow drivers to use the official checklist during the test.
Because of these differences, drivers should study their own test vehicle and use official state materials. Fleets that run hotshot trucking operations using medium-duty trucks and flatbed trailers should confirm the license class first before opening a textbook.
CDL pre-trip inspection components to study
For each component group on the pre-trip inspection test, drivers must spot signs of damage and explain to the examiner what they are checking. Each zone below includes a table with sample explanations your drivers can use.
Every table below uses a Class A tractor-trailer as the example vehicle. Components and testing requirements always vary, so drivers should use their current CDL manual for reference. Many states include a CDL A pre-trip inspection checklist or memory aid that groups items by zone.
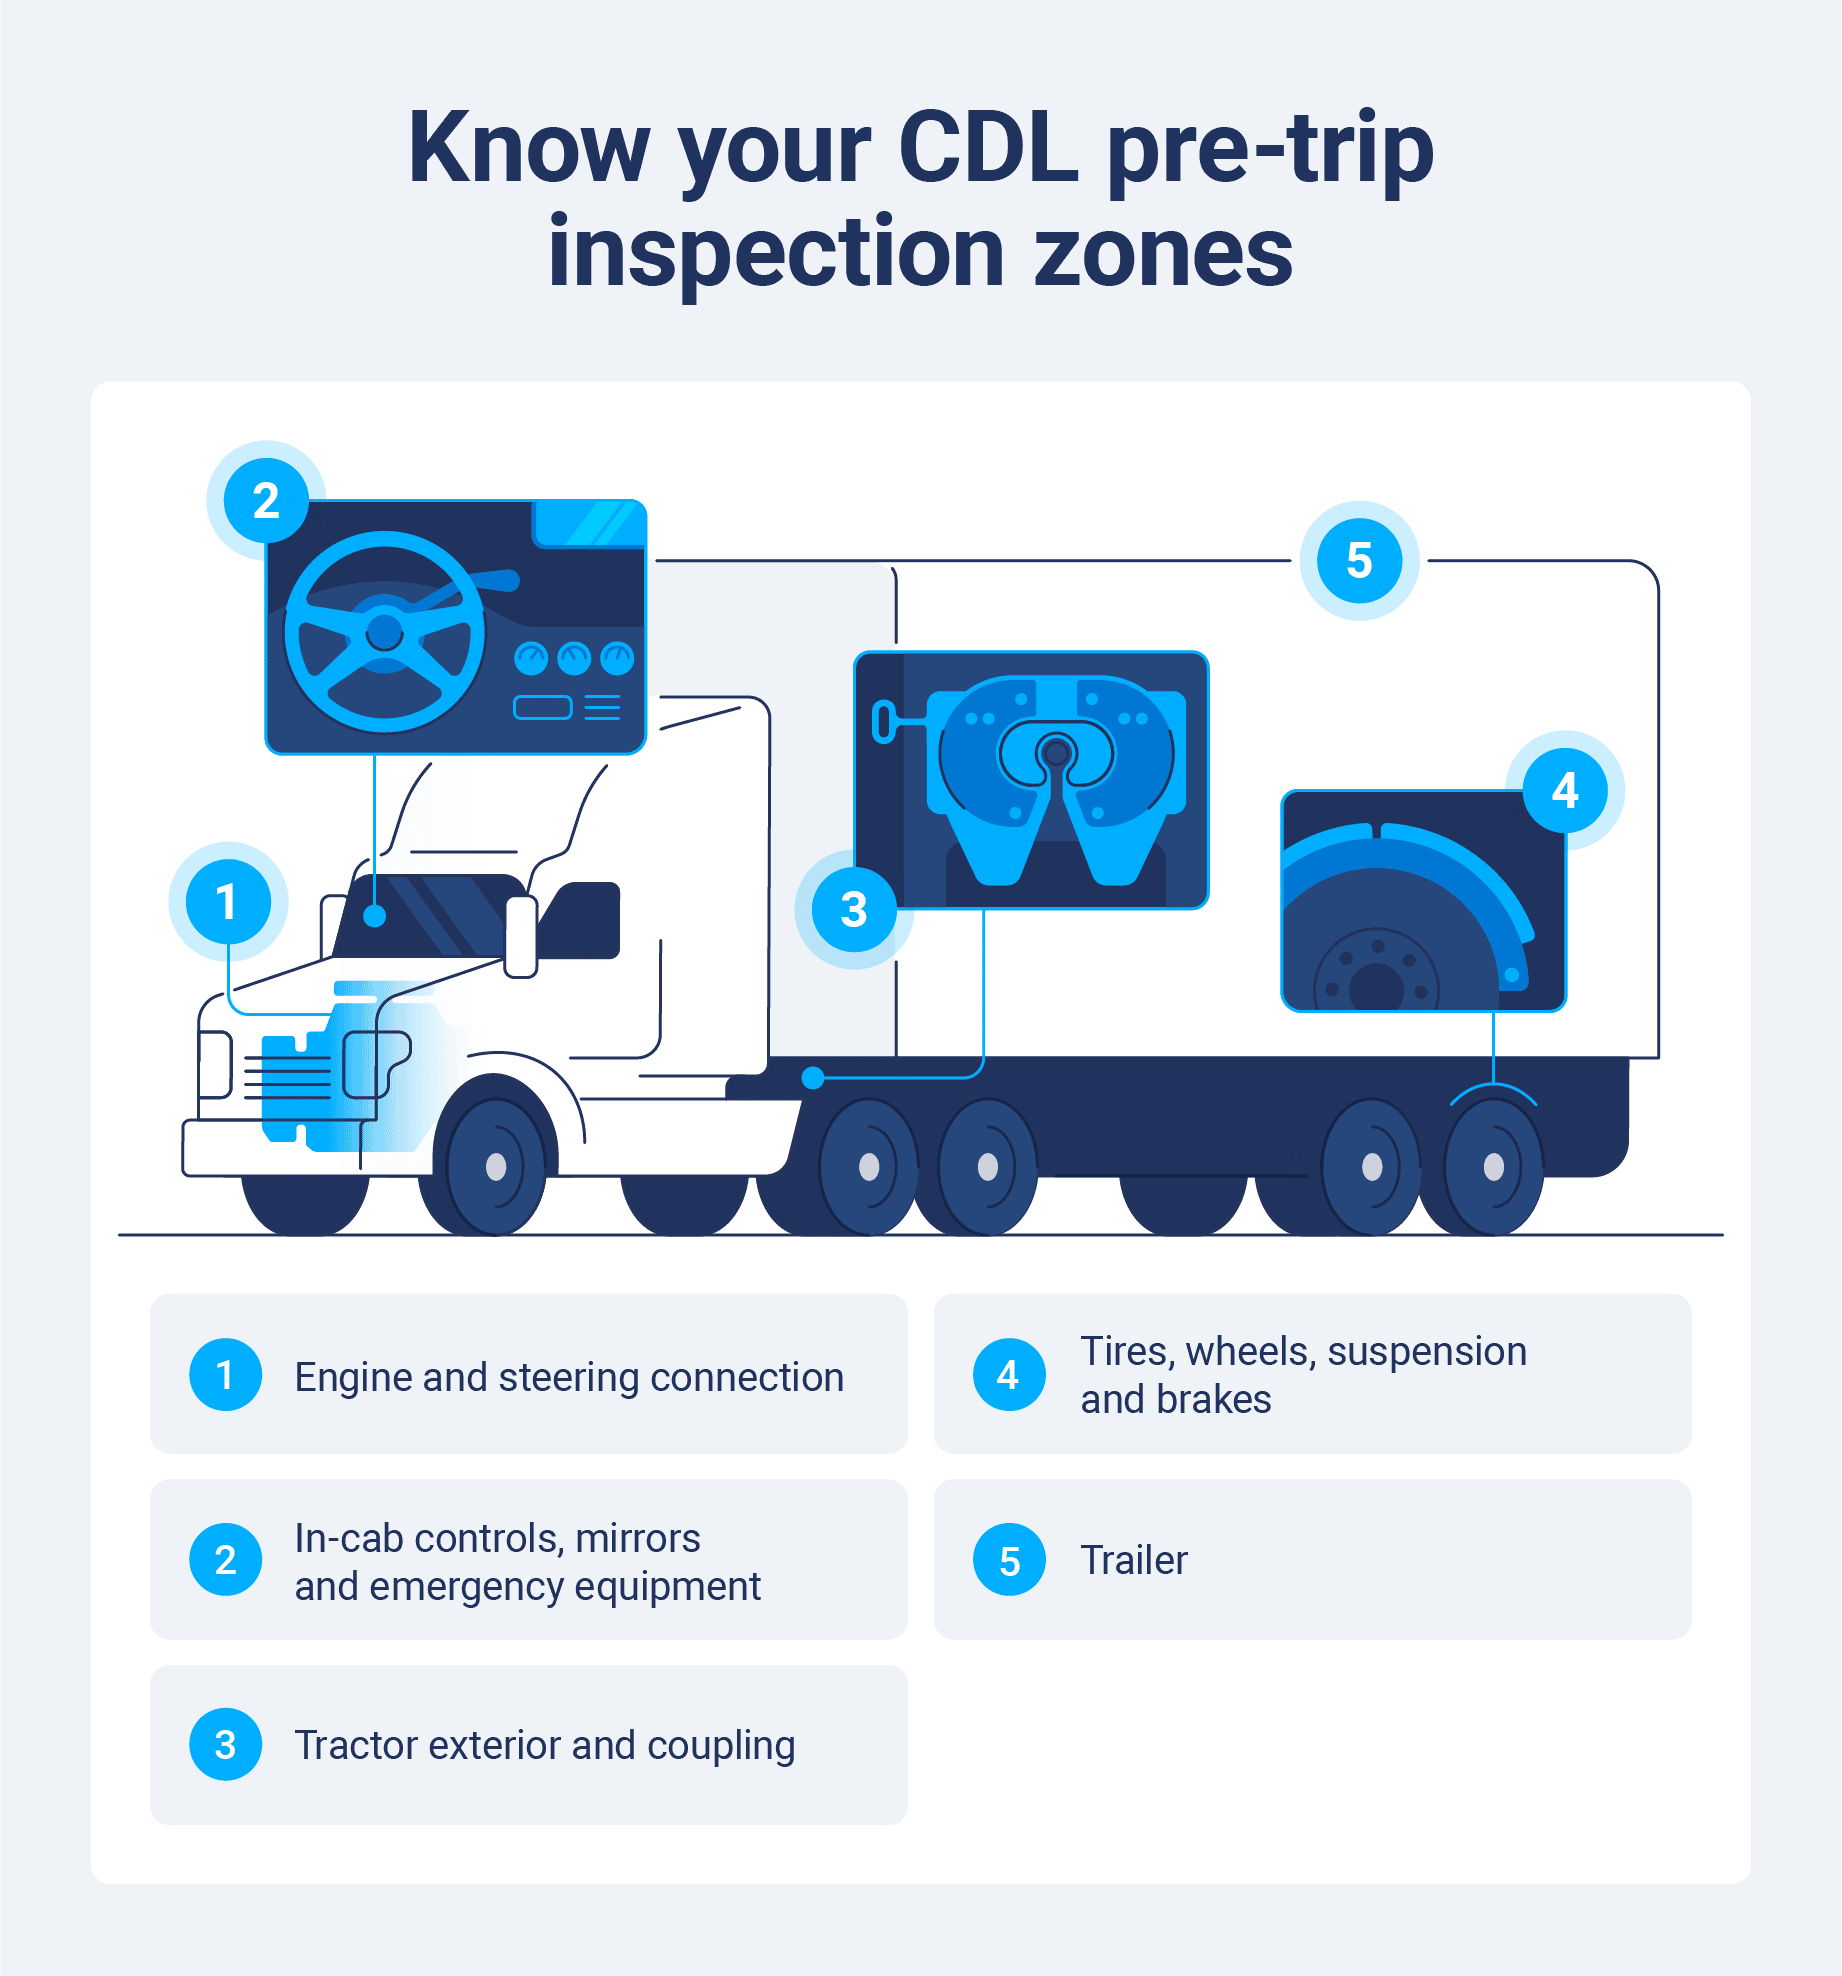
Engine compartment and steering
Under-the-hood checks help drivers catch fluid, belt, hose and steering problems before they lead to a breakdown. Your driver should confirm fluid levels, look for leaks and check belts for tension and wear. For steering, drivers should check for worn, loose or damaged connections between the steering gearbox and the wheels.
Examiners listen for specific conditions. Belts should meet the vehicle manufacturer's specifications for tension and wear, and fluid levels should be within the proper operating range.
| Component | What to inspect | Example explanation |
| Engine oil | Level and leaks | "The oil has no leaks and is above the refill mark, within the safe operating range." |
| Coolant | Level in the reservoir or sight glass | "Coolant has no leaks and is at the proper level in the sight glass." |
| Power-steering fluid | Levels and leaks | "The hose shows no leaks, and the fluid is above the refill mark." |
| Belts (alternator, water pump, air compressor) | Tension, cracks and frays | "The belt has no frays or cracks and has the proper tension according to vehicle specifications." |
| Hoses | Condition and leaks | "The hoses have no cracks, leaks or bulges, and the clamps are tight." |
| Steering gearbox | Mounts, hardware and leaks | "The gearbox is firmly mounted, has no leaks and has no missing nuts, bolts or cotter keys." |
| Pitman arm, drag link and tie rod | Wear, cracks and loose joints | "The arm, link and rod are not bent or cracked and the joints are tight." |
Tires, wheels, suspension and brakes
These components carry the load and keep the vehicle stable and bring it to a stop. Examiners often expect driver applicants to repeat the same check on every axle. Tire requirements come from federal standards, so a review of the DOT tire regulations for commercial vehicles can help drivers understand the importance of every check.
Suspension and brake checks often happen at the same stop. Drivers can look at the tire and rim, the shocks and springs, the brake chamber, the slack adjuster and the drum at each wheel.
| Component | What to inspect | Example explanation |
| Tires | Inflation, tread depth, cuts and bulges | "I check inflation with a gauge and confirm at least 4/32 inch of tread on steer tires and 2/32 inch on all others." |
| Rims and lug nuts | Bends, cracks and signs of looseness | "The rims are not bent or welded, and all lug nuts are present, with no rust trails or shiny threads." |
| Hub oil seals | Leaks and oil level | "The seal is not leaking, and the sight glass shows enough oil." |
| Dual tires | Gap between tires | "The duals are evenly spaced and do not touch each other." |
| Springs, air bags and shock absorbers | Cracks, shifts and leaks | "No leaves are cracked or shifted, the air bags hold air and the shocks are not leaking." |
| U-bolts and mounting points | Loose, cracked or absent parts | "The U-bolts and spring hangers are tight, with no cracks or missing bolts." |
| Brake hoses and chambers | Condition, connections and leaks | "The hoses have no chafing or leaks, and the chambers are not cracked or dented." |
| Slack adjusters and pushrods | Absent parts and pushrod travel | "No parts are missing, and the slack adjuster and pushrod are properly positioned within the applicable adjustment limits." |
| Drums or discs and linings | Cracks, contamination and lining thickness | "The drum has no cracks or grease, and the visible lining is not worn dangerously thin." |
Tractor exterior and coupling system
Drivers should use exterior checks to confirm the tractor is roadworthy and visible on the road.
Behind the cab, the coupling system connects the trailer to the tractor, so it requires the most careful inspection in this zone. Drivers should identify each coupling part and explain how it connects and locks in place. Fleets that run sliding fifth wheels should also teach drivers to check the locking pins.
| Component | What to inspect | Example explanation |
| Mirrors, doors and steps | Damage and mounting | "The mirror and brackets are firmly mounted, and the door opens and closes properly." |
| Fuel tanks and straps | Leaks, caps and mounting | "The tank and straps are tight, the cap is on and I see no leaks." |
| Frame | Cracks, broken welds and holes | "The frame rails and cross members have no cracks or broken welds." |
| Lights and reflectors | Color, cleanliness and function | "The lights work, and the reflectors are clean with amber on the sides and red on the rear." |
| Fifth-wheel mounting assembly and skid plate | Loose bolts, cracks and lubrication | "The mounting bolts are tight, the platform has no cracks and the skid plate has a layer of grease." |
| Kingpin and trailer apron | Bends, cracks and gap | "The kingpin is not bent, and the apron sits flat on the skid plate with no gap." |
| Locking jaws and release arm | Engagement | "The jaws are fully closed around the kingpin, and the release arm is engaged with the safety latch in place." |
| Air and electrical lines | Cuts, chafing and leaks | "The lines are not cut or tangled, and I hear no air leaks." |
Trailer components
When your driver performs trailer checks, they should focus on structure, lighting and the equipment that holds the cargo. Damaged landing gear or an unlatched door can create a safety hazard. At the front of the trailer, drivers should check the air and electrical connections, ensuring the glad hands lock in place with no air leaks and that the electrical plug sits firmly in its socket.
| Component | What to inspect | Example explanation |
| Trailer body and frame | Cracks, holes and broken welds | "The frame, cross member and floor have no cracks, holes or broken welds." |
| Landing gear | Position, parts and damage | "The landing gear is fully raised, the crank handle is stowed, and no parts are missing." |
| Doors and latches | Damage and latching | "The doors close and latch properly, and the hinges are not damaged." |
| Lights, reflectors and reflective tape | Function, cleanliness and damage | "All lights work, and the reflectors and tape are clean and intact." |
| Rear underride guard | Damage and mounting | "The guard is not bent or cracked, and the mounting bolts are tight." |
| Straps, chains and binders | Condition and tension | "The straps and chains are tight and show no cuts or broken links." |
| Tandem release arm and locking pins | Engagement | "The locking pins are fully engaged, and the release arm is locked in place." |
In-cab controls and emergency equipment
In-cab checks demonstrate how a driver sees and responds to problems. Some items need an operational demonstration, so your driver must turn on each light to confirm the matching dash indicator works or test the horn and defrosters.
Emergency equipment calls for a different type of check since your driver must confirm each item is present and ready for use. Drivers must locate spare electrical fuses, three red reflective triangles and a charged, properly rated fire extinguisher. If the vehicle lacks fuses, they should tell the examiner. School bus applicants have to check for additional items, like a first-aid kit.
| Component | What to inspect | Example explanation |
| Windshield and mirrors | Cracks, obstructions and adjustment | "The windshield is clean with no damage, and the mirrors are clean and adjusted." |
| Wipers, washers and heater or defroster | Operation | "The wipers and washer work smoothly, and the heater and defroster both work." |
| Seat belt | Mounts, latch and webbing | "The belt latches and adjusts properly and is not ripped or frayed." |
| Horn and lighting indicators | Operation | "The horn works, and each dash indicator lights up when I turn on its matching light." |
| Gauges and warning lights | Readings after engine start | "Oil pressure is rising, the temperature gauge is climbing normally and the air gauge is building pressure." |
| Steering wheel | Free play | "The steering wheel has no excessive free play, according to the vehicle and state testing requirements." |
| Emergency equipment | Presence and condition | "The fire extinguisher is charged, rated and firmly mounted, and I have three reflective triangles and spare fuses." |
How to prepare for the CDL air-brake check
On air-brake vehicles, the air-brake check carries the most weight. New York, for example, treats failure to correctly perform all three parts of the check as an automatic fail. In Iowa, drivers must complete every part of the air-brake check before the rest of the vehicle inspection test even begins.
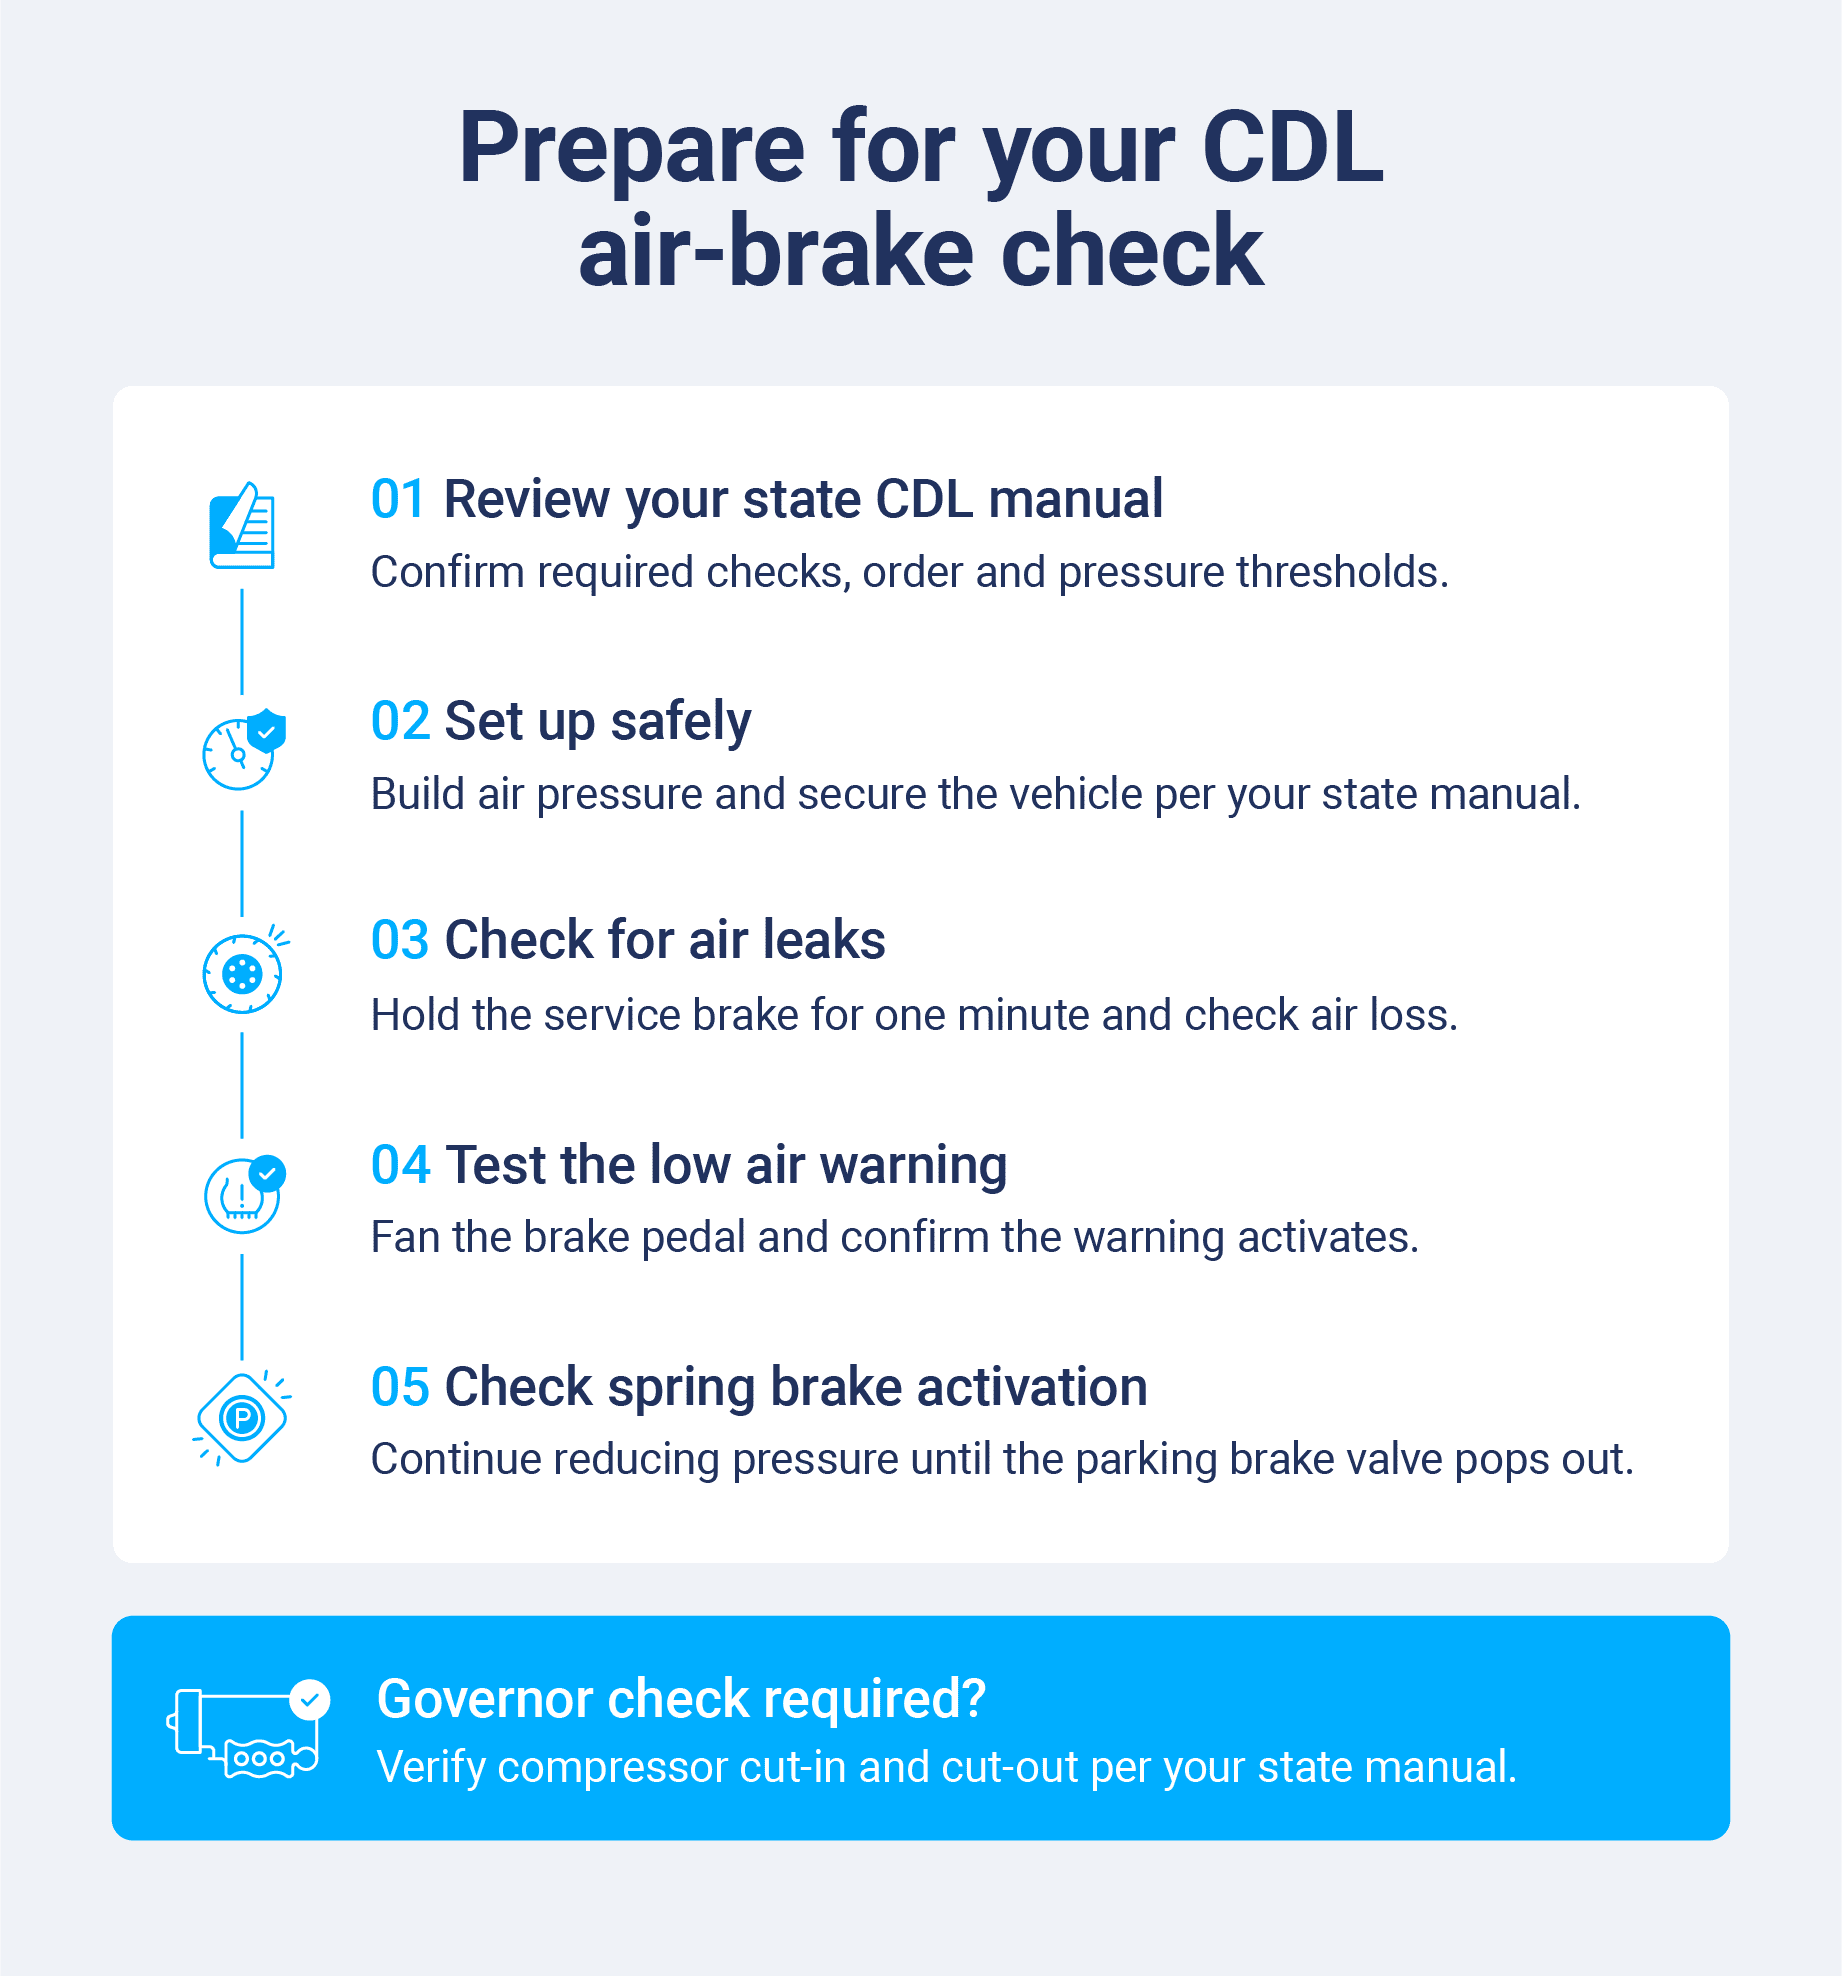
Safe setup comes first. Drivers build air pressure to the governor cut-out, shut off the engine, chock the wheels if needed and release the parking brakes before beginning. The exact steps and order come from the state manual:
- Applied pressure (leak check): Drivers should apply the service brake fully and hold for one minute. Air loss should not exceed 3 psi for a single vehicle or 4 PSI for a combination vehicle. This checks for excessive air loss when the driver applies the brakes.
- Low air warning check: With the key on, your driver should fan the brake pedal to bleed off pressure. Confirm that the buzzer, light or flag activates before pressure drops below 60 PSI. This verifies that the low air pressure warning system activates at the required threshold.
- Spring brake activation check: Drivers should continue pressing and releasing the brake pedal to reduce air pressure. Verify the parking brake valve pops out as pressure drops, confirming the spring brakes have been activated.
- Governor cut-in and cut-out check (where required): Follow state manual and vehicle specifications to verify that the air compressor starts building pressure at the specified cut-in point and stops building pressure at the specified cut-out point.
Not all states require the governor check. New Jersey includes the air gauge and governor cut-off check in its four-part procedure, while New York just lists three required parts. Your driver must confirm every threshold against the state manual and vehicle specifications, then practice how to explain what each check proves.
How to practice your CDL pre-trip inspection
Drivers who want to know how to pass the CDL pre-trip inspection should focus on understanding, not just memorizing a generic script. Fleets that train new drivers can support that with structured yard time, such as scheduled practice sessions on a parked vehicle in a fleet yard. A coach familiar with the test can also help. A simple practice plan can look like:
- Review the current vehicle inspection test instructions from your state. Check which testing system applies and what you can reference during the test.
- Practice in a consistent order that fits those instructions. Use the same routine each time to reduce missed items.
- Explain each condition check as you identify the component. Describe what a good condition looks like, such as no cracks, leaks or loose parts.
- Complete practice demonstrations with an instructor and revisit missed items. Keep a list of weak spots and start the next session there to improve.
Drivers who ask how to remember the pre-trip inspection for the CDL test usually do best with a fixed walkaround route. Drivers can also group related checks, such as suspension, brakes and tires at each axle, to make the inspection easier to remember.
Common CDL pre-trip test mistakes
Most lost points come from incomplete explanations, not a lack of knowledge. Rules for scoring vary by state, and some errors carry automatic consequences, such as the air brake rules already mentioned. A failed attempt can also delay a new hire start date. Common mistakes and how to address them include:
- No explanation after naming a component: Name the part, then the condition: "The hose is not cracked, chafed or leaking."
- Generic explanations: Match the check to the part. Belts get tension and fray checks; tires get tread, inflation and damage checks.
- Skipped or reordered air brake steps: Practice the full sequence until it is automatic. Some states fail applicants who miss a step.
- Missed components or required demonstrations: Follow the same route every time and repeat axle checks on the tractor and the trailer.
Build consistent inspection habits beyond the CDL test
The routine that drivers build for the CDL pre-trip inspection can become part of their daily inspection habits. The same walkaround becomes the daily inspection that keeps vehicles safe and compliant. Inspection time also counts as on-duty time per FMCSA rules, so understanding hours of service helps fleets build inspection into each shift.
The next challenge is what happens after inspection: Findings need to reach maintenance teams for follow-up, and records must remain organized for roadside inspections. A practical pre-trip inspection checklist gives drivers a consistent format to follow.
Geotab Drive supports that workflow with electronic driver vehicle inspection reports (DVIRs). Drivers can complete inspections in the app, and fleet managers receive real-time defect notifications to schedule repair faster. Geotab also offers ELD solutions for HOS compliance.
Drivers can focus on performing physical checks, while Geotab supports the records and follow-ups that come after.
Subscribe to get industry tips and insights
Frequently Asked Questions
You can pass the CDL pre-trip inspection by studying your state-specific CDL manual, learning the components on your test vehicle and practicing in the same order. During the test, point to or touch each item and explain what you are checking and why. Complete every required brake check, especially the air-brake check on air-equipped vehicles.
The CDL pre-trip test covers a lot of material and can feel overwhelming. Oftentimes, drivers find it manageable with regular practice on an actual vehicle. The workload also depends on the license class, since a Class B test may include special features, such as school bus equipment.
Most state procedures include an applied pressure leak check, a low air warning check and a spring brake activation check in the CDL air-brake check portion of the test. Some states add a governor cut-in and cut-out check.
Under 49 CFR 393.75, front tires on a truck, truck tractor or bus need at least 4/32 inch of tread depth. All other tires need at least 2/32 inch. Measure in a major tread groove, not on tie bars or humps. Fleets can review minimum tire tread depth requirements by tire position to plan replacements before tires reach those limits.
No single national number applies. Each state scores the vehicle inspection test. Some errors, such as an incomplete air-brake check, count as automatic failure. Some states also limit retests; for example, California allows only three attempts to pass its skills test
Start with the checks in the coupling table above, then cover the parts that vary by setup. On a sliding fifth wheel, confirm the locking pins are fully engaged and the tractor frame will clear the landing gear in turns. For a pintle hook or ball hitch, inspect the locking mechanism and confirm safety chains do not have kinks or excess slack.
Common failure points on the CDL pre-trip exam include an incomplete or out-of-order air-brake check, vague explanations, skipped trailer axles and inflation checks without a tire gauge. A missed demonstration, like a parking brake check, can also lead to docked points. Regular practice helps your drivers address these weak spots before test day.
Geotab team
Table of Contents
Subscribe to get industry tips and insights
Related posts

OTR trucking: How to improve driver safety and fleet efficiency
October 29, 2026
7 minute read


Geotab's Response to PHP Vulnerabilities (CVE-2026-109618, CVE-2026-109619)
October 28, 2026
1 minute read

How video telematics helps drivers trust the safety program
August 27, 2026
4 minute read

Lone worker safety for utility fleets: A checklist for the sites beyond cellular reach
August 24, 2026
3 minute read
Three steps to help defend your waste fleet against garbage truck collision claims
August 18, 2026
3 minute read